

Broken Station is the first Defense Mode map sets within a demolished landscape where soldiers must defend their spacecraft against various creatures.
Availability[]
|
Description[]
GRX striking agents in the transport airship were quiet. They were not afraid of the following battle. They were veterans and rather excited to engage in the first battle after a long time; however, this situation where no one makes a joke to ease tension was unfamiliar.
They were going to a metropolis. It was already two years since the battle with the corrupted Alpha happened in the secret base of Blitz. After a long period of silence followed by a narrow win in the fight, people in the world were carefully cherishing hope and establishing the large city in their old memory. They emphasized with each other and hoped to recover the old city and cure their wounds in the heart, watching their base reviving from the wreckage. However, Blitz did not have mercy upon any slight hope.
Blitz, returning from the past, became stronger, bigger, and more merciless. Living weapon appearing in the city all of sudden rapidly devoured the large city. When GRX organized the striking group, more than half of the city was ruined.
Although massive new weapons and forces were together with the group, GRX agents going to the aiming point felt devastated; they saw the hell of two years ago, which was not expected at all, in front of them as if punishing their complacency. GRX agents changed their agony and shame into the fighting spirit. There was no mercy for Blitz. What remained was the only spirit for revenge to anticipate Blitz’s destruction. Imagining the upcoming revenge, they put a smile on their lips.
The map takes place in a ruined industrial zone with the factory as the main defense spot. There are 3 small doors to enter/exit the factory, as well as a side ledge with some ramps that zombies can take to access the factory on the 2nd floor. Three ammo stations are provided - one inside the factory, one on the left side, and one are on an elevated platform on the right.
Zombies spawn from 3 main entry points: 2 tunnels each side of the map and the area under a bridge in the middle. They can also appear on the side ledge (right) or drop down from some ruined buildings (left). Also, some zombies will appear from the ground (Similar to the Moles in Devastated City).
Differently from other maps, Hard difficulty works with both 10 or 15 rounds setting, and thus the reward is much more limited. A time attack mark will appear on the object's life bar and soldiers must do their best to prevent it from emptying.
To increase the difficulty, there are more spawn points for zombies to start attacking the base, including two that leads directly into the factory. Starting from Round 5, a few random zombies will be introduced - they have different skin that looks similar to Crazy Titan and a Warning sight on their head. These guys are much tougher and deal more damage to soldiers/objects, so they must be taken care of ASAP. Killing them will earn everyone one of these three perks: Ammo refill, Bonus Fuels, or Berserk (Similar to F-skill in older maps)
Supply drops are introduced to help soften up the zombies, including Fuel (+50 credits), AP Gatling Gun, and Taser Glove Gold. At the end of later rounds, the object will regain some of its HP.
The reward system works the same with Easy and Normal setting, but soldiers will be able to earn the Yellow reward box in addition to Silver, Blue, and Orange, which contains exclusive prizes in the Hard setting. If soldiers manage to keep the Lifebar past its Time Attack Mark, an additional Heroic Clear Prize will be granted for the whole room - the prize pool depends on base difficulty (So it will select prizes listed in "Easy" if Easy setting is chosen and similar with Normal).
- It's recommended to spend 100 GP before entering the round so you can immediately buy the Turrets. In early waves, place it outside and let it kill off zombies, but move it back inside on later waves. Upgrade it as soon as you have enough credits
- Make sure to cover all the entrance equally. In early waves, go out and kill zombies at their spawn point, but get ready to retreat should your teammates happen to let some slip through.
- Careful with the red Crawler, they ignore all attacks and head straight to the device. Kill them as soon as they appear.
- Airstrike should only be used against a group of large, slow-moving zombies. Target ahead them a bit to make up delay time - with a bit of practice, you can easily get it right.
- In the later wave (10 onward), it's wise to retreat to the factory and use Sentry to help soften the zombies. Use Claymore when there are too many of them - more than likely you will score a lot of damage, enough to pull out another one right away.
The Horde[]
| Stagger | Description |
|---|---|
|
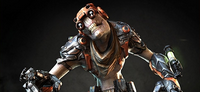
The usual slow walking creatures, spawning from various spots and slowly marching towards the base in a poor attempt to sabotage the ship. They unintentionally serves as target practice for the soldiers. |
| Stone Louser | Description |
|---|---|
|
A variant of the crawling assassins from the Crater & Theater, they can still spawns in various elevated spots and walk on the wall. They can also jump high enough to access the balcony of the main base. |
| Spark Mole | Description |
|---|---|
|
The moles from Devastated City returns; they will emerge from the ground, the broken bridge, etc. They will attempt to sneak behind soldiers and / or destroy their defenses and equipment. |
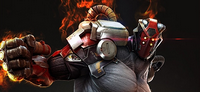
| Acid/Kaboom Pot | Description |
|---|---|

|
Looking somewhat similar to the Pollutants from Devastated City, these mutants carrying large tubes acids (slows down) or chemical explosives (blast) will cause collateral damages upon death. |
| Energy Spitter | Description |
|---|---|

|
These large bugs use a similar blaster as Big Bear's, although with a much smaller blast radius, but still somewhat deadly if soldiers do not notice them or their target on the ground. |
| Crawler | Description |
|---|---|
|
Ant-lion looking creatures which, once killed, split into two smaller crawler, resulting in more enemies to deal with if there are multiple large crawler getting killed at the same time. |
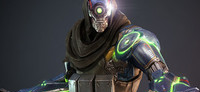
| Sprinter | Description |
|---|---|
|
Sneaky small creatures tasked to focus on rushing the spacecraft specifically They can easily be overlooked or underestimated, thus potentially causing a lot of damages if they infiltrate the base. |
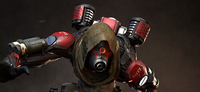
| Demolisher | Description |
|---|---|
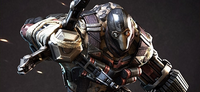
|
Rather large creatures marching towards the soldiers, activating their force-fields to tank incoming shots as they don't have a lot of healths. Their main goal is simply to distract soldiers. |
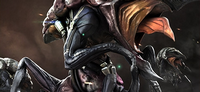
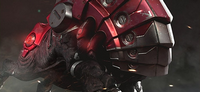
| Disaster | Description |
|---|---|
|
These enormous beasts are meant to distract soldiers and totally make their situation a living hell. If the soldiers focus too much on them, they may potentially let uninvited guests breach. |
Rewards[]


Trivia[]
- While the opening cut-scene, the player is played as OMOH and equipped with a M4-Commando, however, when the game starts, the player will use the character and the bag's weapons which they are equipped.
- Upon its release in CF Vietnam, the Last Spot contains two hard-to-access ledges on the second floor that players could jump to and be immune to zombie's attacks (minus the ranged one). Coupled with Infinite Ammo Belt item, a skilled player can stay on the ledge and draw all zombies toward him while his teammates do the job, making this map trivial to beat. This was fixed in subsequent patches, although a few spots can still be accessed (albeit they are less effective than the other mentioned above).
- After Hard difficulty was added, these spots unintentionally return, due to hard difficulty utilizes extra map props and the core map used still contains these spots.
- This is the only Defense Mode map that features no boss battle. Players will just simply face the hordes of zombies until the end.
- In CF Russia there is a glitch on the map, that causes instant death on spot. The origin of this glitch and what is causing it are still unknown.
Media[]
")
")
")
")
")
")
")
")
")
")
")
")
")
")
")
")
")
")
")
")
")
")
")
")
")
")
")
")
")
")
")
")
")
")
")
 AI2 GamePlay ! (31 KB)")
")
")
")
")